How to create a landing page 4 – Header, Footer, Copyright
Creating a header
Preparing the menu
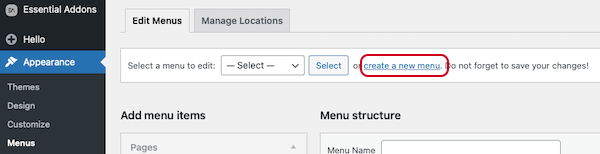
Create a menu in WordPress.
① Open Appearance > Menus and click “Create a new menu.”
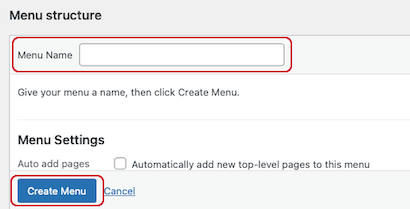
② Enter a menu name and click “Create Menu.” Let’s create one called “Menu_Sample.”
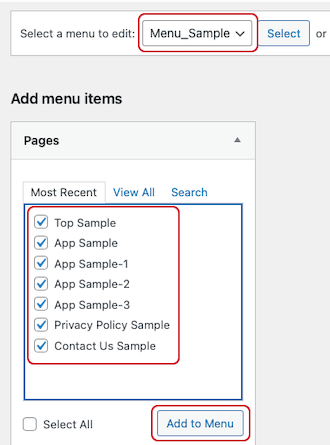
③ Select the created “Menu_Sample.” The published static pages will be listed, so check them and click “Add to Menu.”
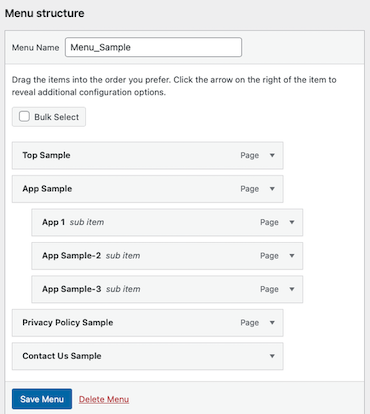
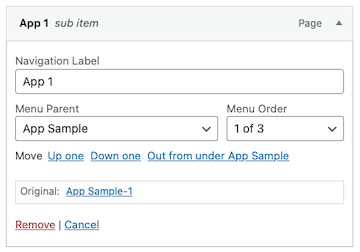
④ Adjust the menu layout and click “Save Menu.” Here, we made App Sample-1 to 3 subitems of App Sample.
⑤You can adjust the actual display labels for each menu label by clicking “Page ▲.”
Creating the Header
Once the menu is ready in WordPress, next create the header using Essential Addons.
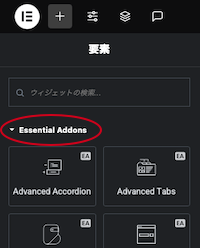
In Elementor, header widgets are only available in the paid version, Elementor Pro, so add the Essential Addons plugin. Essential Addons provides header widgets even in the free version.
①Install the “Essential Addons” plugin. Search for it in WordPress Plugins > Add Plugins, then install and activate it.
②Open the fixed page where you want to add the header using “Edit with Elementor.” The Essential Addons widgets will then be selectable.
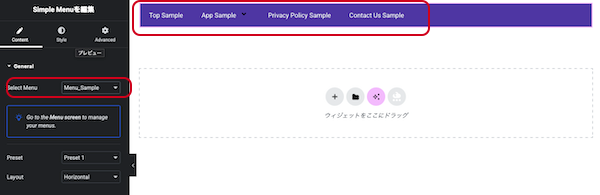
③Add the “Simple Menu” from Essential Addons.
④Select the pre-created “Menu_Sample” under Content > Select Menu, and the menu labels will appear immediately.
⑤If the display width is narrow, the three-line mark (hamburger menu) will appear, and the menu will be displayed vertically. You can adjust the menu display settings as follows.
Content > Hamburger Options > Breakpoint
⑥You can adjust the menu color as follows:
Background color: Style > Main menu > Background Color: #FFFFFF
Text color: Style > Top Level Item > Text Color: 1E293B
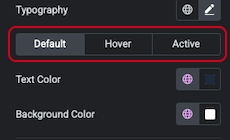
⑦Menu colors can be set for the default state, hover state, and active state, with background and text colors adjustable for each.
Background color: Style > Top Level Item > Background Color
Text color: Style > Top Level Item > Text Color
⑧By creating a container in advance using Flexbox and adding the menu to the container, you can also add icons in the same order.
⑨Once you have the following, the menu bar is complete.
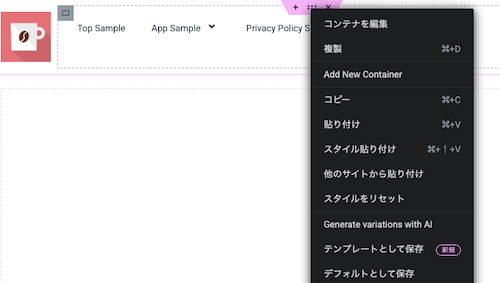
⑩The menu bar you created can be copied by right-clicking the six-dot icon in the section, then pasted onto other pages or saved as a template for reuse. The footer you’ll create next can be handled the same way.
Creating a footer
Creating a footer
①Create multiple containers using Flexbox.
②Enter the information you want to display, such as About us, Quick Link, Contact Info, Newsletter, etc. The following is a sample template available in Elementor. Please refer to it.
Adding a Copyright
①Add a copyright.
②Add a container and set the background color to black.
⑤ Once it looks like this, the footer Copyright is complete.
If using Elementor Pro (paid version), you can set automatic updates for “2025,” but since we are using the free version of Elementor, this part will need to be manually updated when the year changes.
How to create a landing page 4 – Header, Footer, Copyright